Motivation : Suppose, you are writting a program that requires you to compute the area of a rectangle at several different places.
you can do two things :
1> restructure the code so that all the area computations are done at one place. So, that a loop can be used to do the task.
2> write the code(to compute the area) at all the places where it is required(or copy paste).
Now, both of the above two choices have flaws. In the first approach, you may overcomplicate the problem trying to restructure it, or in the worst case you are a beginner and are not able to restructure the code at all, in which case you resort to the second method. This as a result makes your code look clumsy,
repetitive and sometimes too hard to interpret by someone viewing the code
and not to forget that you have to put labour in retyping the code multiple times.
So, how do we solve the problem, so that none of the above mentioned problems arise. The answer is we have to use Functions.
definition : It is a module (block of code) that does a particular task.
Informally a function can be thought of as a magical box which takes some input and produces some output.

Syntax :
return data type function_name ( arguments* ) {
// function body. We write the logic here for the
// task we want the function to perform.
}
data type : dt,
arguments : ( dt1 var1, dt2 var2, dt3 var3, ............, dtn varn)
vari -> represents the name of the ith variable of the argument
list.
dti -> represents the data type of the i th variable in the argument
list.
(Note that : there may exist (i, j) such that dti = dtj for i != j )
Now, let's analyze each component one by one in detail :
1> return data type : This is the data type of the variable that the function is expected to return, i.e. say you have an area function than you expect the function to return a double type variable.
2> function name : This is the name by which this function is referred(called) anywhere it is required. Just like a variable name.
3> arguments : This is the list of variables with data types that the function takes as input. These variables are used by the function's logic to arrive at a result.
eg : in an area function meant for square, only one argument "int x" is required. But in case of area function for a rectangle, we require two arguments "int length, int breadth".
4> Function's Body : This is the part where the main working logic of the function is written. In other words after the execution of these statements we arrive at the final output.
Much like starting out with basic ingredients and then following a few steps to make tea(we are making tea here !!!!! I thought we were learning functions ?). Here tea is the final product.
eg : we will look at it in a moment.....
look at the picture below to get a clear idea of a function.

Variations of function : This variation is based on return type and arguments being void or non void (So, there are 2*2 = 4 possibilities).
look at the following pic to understand the 4 variations of the function :

(Note : if the arguments are of void type, you may or may not specify void)
Function call : It is the process of calling an already defined function. When and where required by the program. The function which contains the function call statement is called the "calling function". The function which is called is "called function" (wow!!! that wasn't a mystery).
e.g. look at the pic below to understand it

(note : there is one more control jump, when the body of the function is done executing, the control jumps back to the calling function i.e. main() here).
Function Prototype : This is a signature of a function. Whose declaration and definition are not done together.(confused are we ???)
This is a method to tell the compiler that i want to define a function later.
look at the pic below to understand it more clearly :
 (Note : the fact that every thing has to be declared at some point before it's usage in a c++ program is known as forward dependence.)
Now, we are ready to take a look at a program
actual parameters : The actual variables(value) that is passed to the calling function by the called function.
formal parameters : The variables used in a function definition to represent the actual variables that are passed to the function during it's call.
look at the picture for further clarification :

Calling Mechanisms : This are two calling mechanism supported in c++.
1> call by value : In this mechanism the value of the actual parameters are just copied to formal parameters. Hence any change in the formal parameters
does not reflect in the actual parameters. Since they are separate variables having the same values.
let's see a program to illustrate this concept :

2> call by reference : In this mechanism the address of the actual parameters are just passed as the formal parameters. Hence any change in the formal parameters reflects in the actual parameters. Since they are same variables having the different names.
before delving any deeper into the concept of call by reference let's look at what is a alias
alias : It is a mechanism using which you can have multiple names for the same memory space(i.e. same variable).
Syntax :
data_type var1 ;
data_type var2 = &var1 ;
look at the following picture too understand what is happening

I explained the concept of alias because when we call a function by "call by reference". We actually create the alias of the actual parameters i.e. the formal parameters become the reference of the actual parameters.


you can do two things :
1> restructure the code so that all the area computations are done at one place. So, that a loop can be used to do the task.
2> write the code(to compute the area) at all the places where it is required(or copy paste).
Now, both of the above two choices have flaws. In the first approach, you may overcomplicate the problem trying to restructure it, or in the worst case you are a beginner and are not able to restructure the code at all, in which case you resort to the second method. This as a result makes your code look clumsy,
repetitive and sometimes too hard to interpret by someone viewing the code
and not to forget that you have to put labour in retyping the code multiple times.
So, how do we solve the problem, so that none of the above mentioned problems arise. The answer is we have to use Functions.
definition : It is a module (block of code) that does a particular task.
Informally a function can be thought of as a magical box which takes some input and produces some output.
Syntax :
return data type function_name ( arguments* ) {
// function body. We write the logic here for the
// task we want the function to perform.
}
data type : dt,
arguments : ( dt1 var1, dt2 var2, dt3 var3, ............, dtn varn)
vari -> represents the name of the ith variable of the argument
list.
dti -> represents the data type of the i th variable in the argument
list.
(Note that : there may exist (i, j) such that dti = dtj for i != j )
Now, let's analyze each component one by one in detail :
1> return data type : This is the data type of the variable that the function is expected to return, i.e. say you have an area function than you expect the function to return a double type variable.
2> function name : This is the name by which this function is referred(called) anywhere it is required. Just like a variable name.
3> arguments : This is the list of variables with data types that the function takes as input. These variables are used by the function's logic to arrive at a result.
eg : in an area function meant for square, only one argument "int x" is required. But in case of area function for a rectangle, we require two arguments "int length, int breadth".
4> Function's Body : This is the part where the main working logic of the function is written. In other words after the execution of these statements we arrive at the final output.
Much like starting out with basic ingredients and then following a few steps to make tea(we are making tea here !!!!! I thought we were learning functions ?). Here tea is the final product.
eg : we will look at it in a moment.....
look at the picture below to get a clear idea of a function.
Variations of function : This variation is based on return type and arguments being void or non void (So, there are 2*2 = 4 possibilities).
look at the following pic to understand the 4 variations of the function :
(Note : if the arguments are of void type, you may or may not specify void)
Function call : It is the process of calling an already defined function. When and where required by the program. The function which contains the function call statement is called the "calling function". The function which is called is "called function" (wow!!! that wasn't a mystery).
e.g. look at the pic below to understand it
(note : there is one more control jump, when the body of the function is done executing, the control jumps back to the calling function i.e. main() here).
Function Prototype : This is a signature of a function. Whose declaration and definition are not done together.(confused are we ???)
This is a method to tell the compiler that i want to define a function later.
look at the pic below to understand it more clearly :
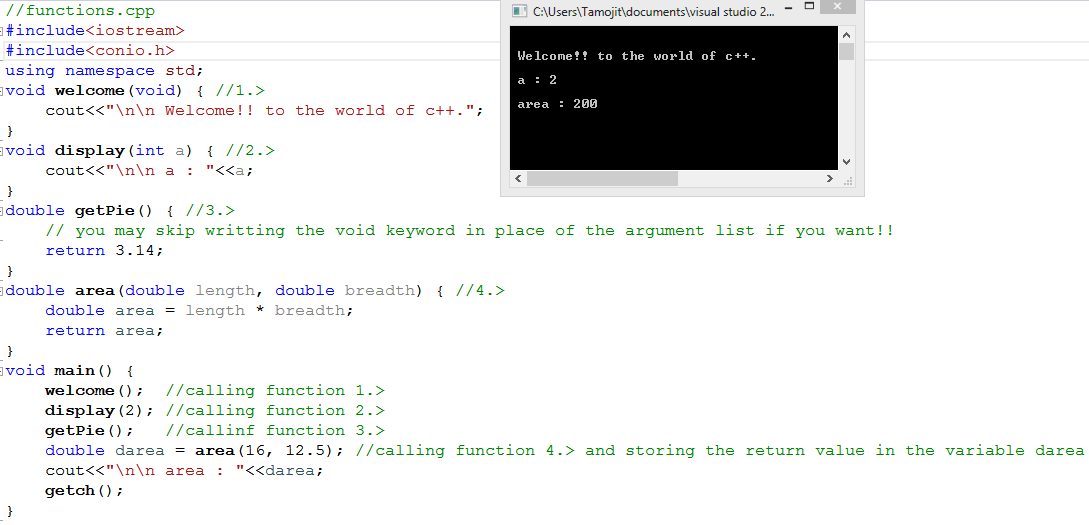
Now, we are ready to take a look at a program
Explanation : only one thing needs to be explained in the above program.
More specifically the call statement of function number '4.> '. Let's look at the statement carefully and try to understand what is happening.
What we are doing here is that, we are storing the return value of the function area() in the variable darea. when the control returns from the body of the function area() it returns the value of variable area(in the function) with the help of the return statement.(Note : we may choose to ignore the value returned from a function.)
actual parameters : The actual variables(value) that is passed to the calling function by the called function.
formal parameters : The variables used in a function definition to represent the actual variables that are passed to the function during it's call.
look at the picture for further clarification :
Calling Mechanisms : This are two calling mechanism supported in c++.
1> call by value : In this mechanism the value of the actual parameters are just copied to formal parameters. Hence any change in the formal parameters
does not reflect in the actual parameters. Since they are separate variables having the same values.
let's see a program to illustrate this concept :

Explanation :
2> call by reference : In this mechanism the address of the actual parameters are just passed as the formal parameters. Hence any change in the formal parameters reflects in the actual parameters. Since they are same variables having the different names.
before delving any deeper into the concept of call by reference let's look at what is a alias
alias : It is a mechanism using which you can have multiple names for the same memory space(i.e. same variable).
Syntax :
data_type var1 ;
data_type var2 = &var1 ;
look at the following picture too understand what is happening
I explained the concept of alias because when we call a function by "call by reference". We actually create the alias of the actual parameters i.e. the formal parameters become the reference of the actual parameters.
Explanation : In the program above, we use call by reference. Notice the '&'
symbols in front of the formal parameters. Now when we call the function with the actual (a, b) in main, the formal parameters (a, b) in the swap function act as an alias to them. Hence any change to the formal parameters reflect on the actual parameters.
look at the following pic to understand more clearly
Recursion : The phenomenon where a function calls itself.
let's look at a program to understand the concept of recursion :
Explain : observe that the function has a basis case. The basis case is the case where we know the value of the function before hand and the recursive step where the function is expressed in terms of smaller instances of itself.
n! = n * (n-1) * (n-2) * ....... * 1
(n-1)! = (n-1) * (n-2) *....... * 1
n! = n * (n-1)! (easy isn't it)
and we know that
0! =1 (basis case)
as with all other posts i have uploaded the source code of all the programs here in google drive here : Learning c++